High Density Urethane

Laughing Tortoise Sign: Part 2

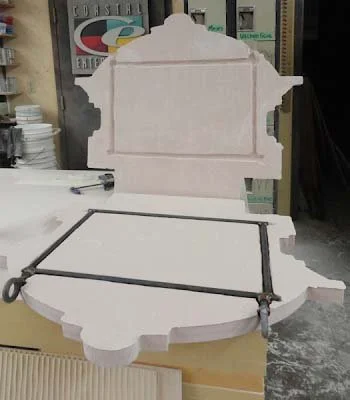
Once the three layers of the Laughing Tortoise sign had finished routing, we used a die grinder to whip the shell into rough shape Then, we used compressed air to blow off the dust before gluing them up with Coastal Enterprise’s PB Bond 240. We also glued in a 1/2" steel rod for the neck. This sign is bound to get more than a little handing once it is installed; the steel will provide it plenty of strength!

Once the glue dried we gave the Tortoise Beer sign the once over with the die grinder. We carved in the scroll detail and textured up the sides to match.

After this it was time to do some preliminary sculpting on the tortoise. (The tortoise will be semi-realistic with a heavy dollop of character added.) We roughed in the head first — often, it works better to build up a foundational shape and then go back to add a detailed layer later. Then we roughed in the shell and feet. (The scales on his legs are just balls of sculpting epoxy.)

The side view shows just how dimensional this sign really is.

Once the first layer of sculpt dried, we finished sculpting the tortoise. The whole head and neck received another layer of sculpt — lots of character, wrinkles and laugh lines too.

Next week we will go through the painting process.

G Street - Part 2

G Street Sign Series: Part 1

As with most types of signs, hanging signs need some interior structure to make sure they stay securely in place. Over their lifetime, signs are subjected to high winds and endless gravity. And of course, there is also the occasional “macho dude” who sees something like a hanging sign and suddenly has to prove how tough he is by jumping up and doing a few chin-ups. We always want to be sure that our signs will withstand the vagaries of weather and weirdos and an internal welded steel frame is our insurance policy.

In the G Street sign’s case, the frame was made from 5/8" solid steel bar. This level of structure is probably overkill but better safe than sorry — after all, it is impossible to make something too strong!

The sign will be suspended by the cast steel eye bolts (which are rated for 5000 pounds each - more than enough!). Once the frame was welded we laid it on the (interior) back of the sign to marked out where it would go. Then, using the die grinder we cut in a 1/2" deep slot not the sign.

We repeated this step on the second side as well, test fitting dry to make sure everything lined up tight.

Then we spread on the Coastal Enterprises PB Bond-240 glue which is formulated for Precision Board HDU. We misted the Precision Board with water to activate the glue and clamped it up tight to dry.

Once the steel is firmly glued inside the sign it was time to glue on the rest of the sign’s detail.

Below you can see the results of our efforts — just waiting for paint.

See you next week!

G Street - Part 1

Jack Niemann's Black Forest Steakhouse needed a second sign for the handicap accessible entrance. Obviously, Jack wanted the sign for the “G Street” entrance be be done in the same style as the first sign. My father’s first step was to create the sign’s vectors in Illustrator - a vector program he is very comfortable with.

Then he imported the vector file into PhotoShop and quickly created this illustration with his digital pen and drawing pad to show Jack what he had in mind — he gave his instant approval.

With Jack’s approval in hand dad imported the vectors into EnRoute and began the task of building the routing file.

He could have used the “sweep two rails” tool to build the crown moulding, but opted to build each element separately and then merge them together at the end for maximum flexibility. Since the vectors were separated into groups, he used the “jigsaw” tool to cut out the shapes and then merged them together.

Then dad used the “bevel relief” tool to create a relief twice as wide as he needed before he merged (merge highest) a zero height relief (of the correct shape) to it to create the final shape he needed.

The top and bottom flat portions of the crown were done in a similar fashion using the “jigsaw” tool.

Then he made the egg shaped reliefs and merged highest to the crown molding.

Once the balance of the reliefs were created, dad merged them together to form the sign. He duplicated and flipped one of the reliefs to make sure the two halves matched perfectly. before adding the G to each side as a beveled letter.

He divided the sign into six pieces to be routed from 2" thick 30 lbs. Precision Board HDU.

Here it is on the CNC table, being routed.

See you next week for Part 2 of the G Street sign series!